WHY PRESSURE CAN?
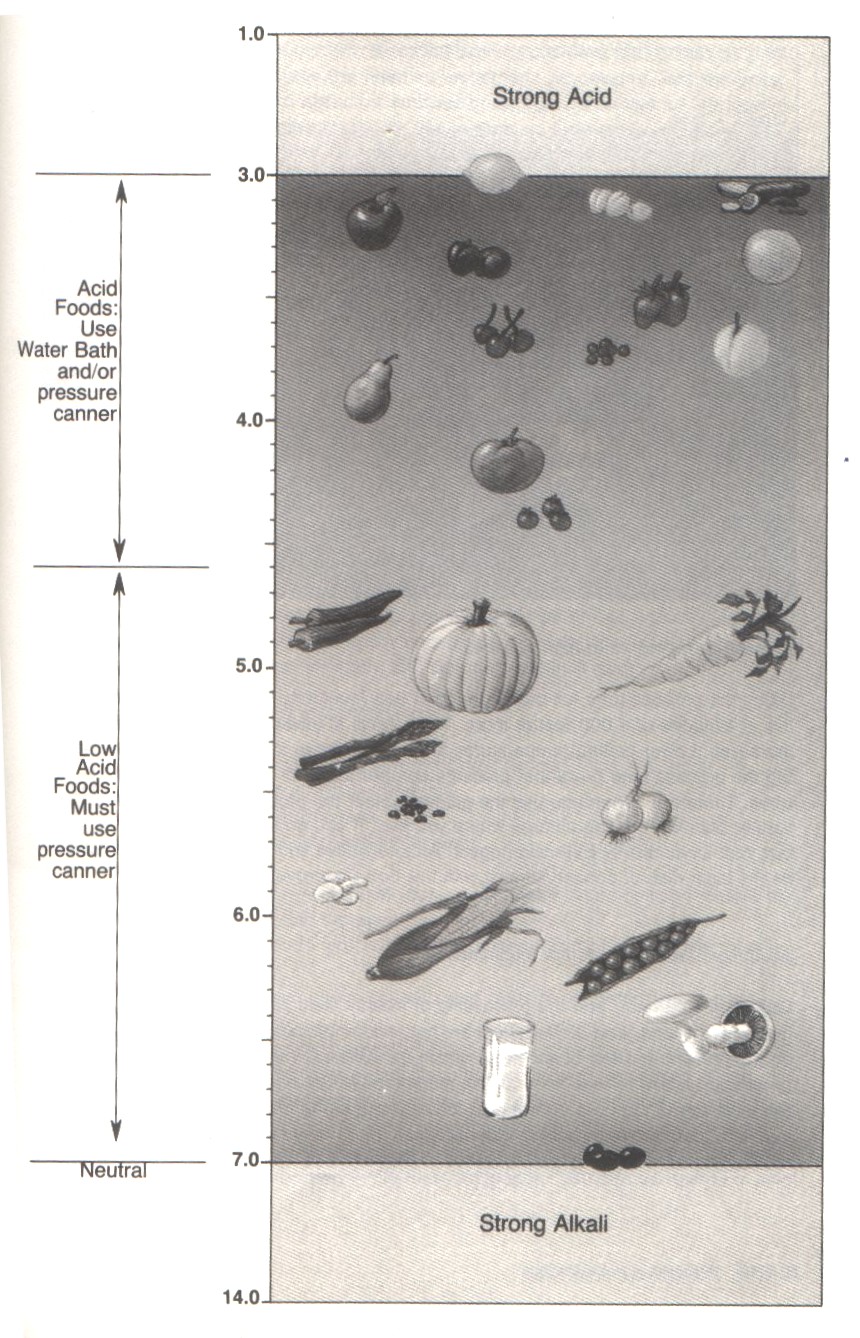
Pressure canners are used to can low-acid foods. "Low-acid foods have pH values higher than 4.6. They include read meats, seafood, poultry, milk, and all fresh vegetables except for most tomatoes. Most mixtures of low-acid and acid foods also have pH values above 4.6 unless their recipes include enough lemon juice, citric acid, or vinegar to make them acid foods." Acid foods have a pH of 4.6 or lower and can be canned using the Wet-Pack Process. If you want a pdf version of the material presented on this web page go here.
See pH Food Chart below to see what foods you use and can with a Wet-pack Canner versus a Pressure Canner -"Complete Guide to Home Canning and Preserving- Second Edition, Chapter 1, p.8-9." :
HOW PRESSURE CANNERS WORK?
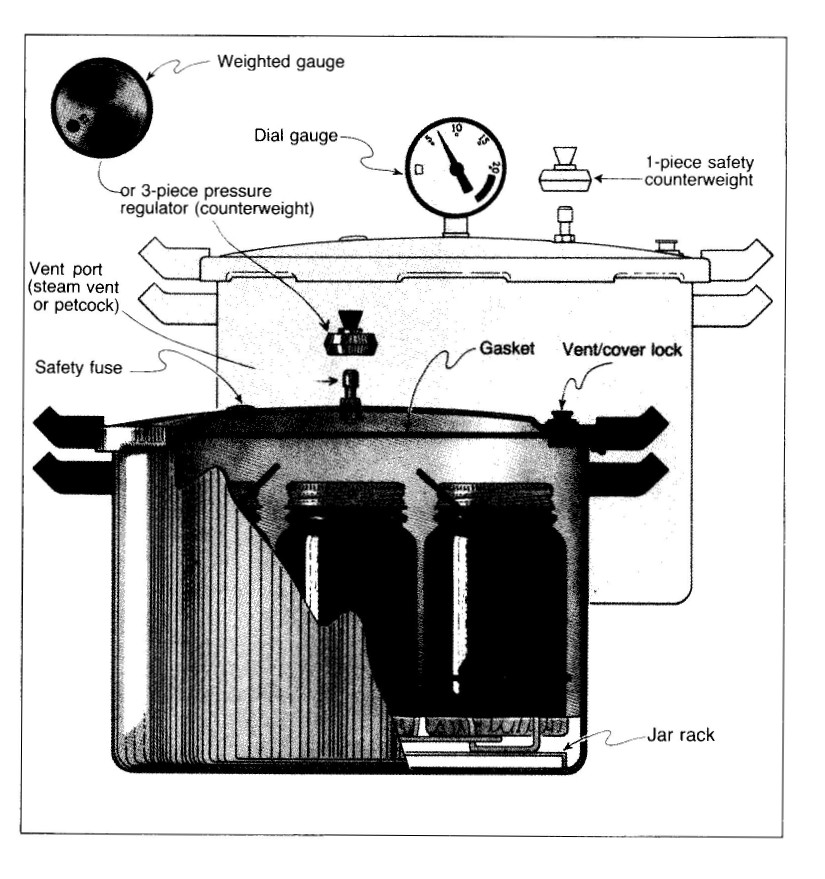
"Modern pressure canners are lightweight, thin-walled kettles; most have turn-on lids. They have a jar rack, gasket, dial or weighted gauge, and automatic vent/cover lock, a vent port (steam vent) to be closed with a counterweight or weighted gauge, and a safety fuse."
"Pressure does not destroy microorganisms, but high temperatures applied for an adequate period of time do kill microorganisms. The success of destroying all microorganisms capable of growing in canned food is based on the temperature obtained in pure steam, free of air, at sea level. At sea level, a canner operated at a gauge pressure of 10.5 lbs provides an internal temperature of 240 degrees Fahrenheit."
See Pressure Canner image below to see what a typical pressure canner looks like -"Complete Guide to Home Canning and Preserving- Second Edition, Chapter 1, p.19-20." :
SERIOUS ERRORS IN TEMPERATURE IN PRESSURE CANNERS
"Two serious errors in temperatures obtained in pressure canners occur because:"
![]() "Internal canner temperatures are lower at higher altitudes. To correct this error, canners must be operated at the increased pressures specified for the appropriate altitude ranges.
"Internal canner temperatures are lower at higher altitudes. To correct this error, canners must be operated at the increased pressures specified for the appropriate altitude ranges.
![]() "Air trapped in a canner lowers the temperature obtained at 5, 10 or 15 lbs of pressure and results in under processing. The highest volume of air trapped in a canner occurs in processing raw-packed foods in a dial-guage canners. These canners do not vent air during processing. To be safe, all types of pressure canners must be vented 10 minutes before they are pressurized."
"Air trapped in a canner lowers the temperature obtained at 5, 10 or 15 lbs of pressure and results in under processing. The highest volume of air trapped in a canner occurs in processing raw-packed foods in a dial-guage canners. These canners do not vent air during processing. To be safe, all types of pressure canners must be vented 10 minutes before they are pressurized."
HOW TO VENT AND OPERATE A PRESSURE CANNER
![]() "To vent a canner, leave the vent port uncovered on newer models or manually open petcocks on some older models. Heating the filled canner with its lid locked into place boils water and generates steam that escapes through the petcock or ventport. When steam first escapes, set a timer for 10 minutes. After venting 10 minutes, close the petcock or place the counterweight or weighted gauge over the vent port to pressurize the canner."
"To vent a canner, leave the vent port uncovered on newer models or manually open petcocks on some older models. Heating the filled canner with its lid locked into place boils water and generates steam that escapes through the petcock or ventport. When steam first escapes, set a timer for 10 minutes. After venting 10 minutes, close the petcock or place the counterweight or weighted gauge over the vent port to pressurize the canner."
![]() "Check dial gauges for accuracy before use each year and replace if the ready high by more than 1 lb at 5, 10, or 15 lbs of pressure. Low readings cause over-processing and may indicate that the accuracy of the gauge is unpredictable. Gauges may be checked at most county Cooperative Extension offices." Go here for our local "Maricopa County Cooperative Extension" Office. You can also contact them by phone at: 602-827-8200 or visit their office at: 4341 E. Broadway Road, Phoenix, AZ 85040-8807.
"Check dial gauges for accuracy before use each year and replace if the ready high by more than 1 lb at 5, 10, or 15 lbs of pressure. Low readings cause over-processing and may indicate that the accuracy of the gauge is unpredictable. Gauges may be checked at most county Cooperative Extension offices." Go here for our local "Maricopa County Cooperative Extension" Office. You can also contact them by phone at: 602-827-8200 or visit their office at: 4341 E. Broadway Road, Phoenix, AZ 85040-8807.
![]() "Handle canner lid gaskets carefully and clean them according to the manufacturer's directions. Nicked or dried gaskets will allow steam leaks during pressurization of canners. Keep gaskets clean between uses. Gaskets on older model canners may require a light coat of vegetable oil once per year. Gaskets on newer model canners are pre-lubricated and do not benefit from oiling. Check your canner's instruction if there is doubt that the particular gasket you use has been pre-lubricated."
"Handle canner lid gaskets carefully and clean them according to the manufacturer's directions. Nicked or dried gaskets will allow steam leaks during pressurization of canners. Keep gaskets clean between uses. Gaskets on older model canners may require a light coat of vegetable oil once per year. Gaskets on newer model canners are pre-lubricated and do not benefit from oiling. Check your canner's instruction if there is doubt that the particular gasket you use has been pre-lubricated."
![]() "Lid safety fuses are thin metal inserts or rubber plugs designed to relieve excessive pressure from the canner. Do not pick at or scratch fuses while cleaning lids. Use only canners that have the Underwriter's Laboratory (UL) approval to ensure their safety."
"Lid safety fuses are thin metal inserts or rubber plugs designed to relieve excessive pressure from the canner. Do not pick at or scratch fuses while cleaning lids. Use only canners that have the Underwriter's Laboratory (UL) approval to ensure their safety."
![]() "Replacement gauges and other parts for canners are often available at stores offering canning equipment or from canner manufacturers. When ordering parts, give your canner model number and describe the parts needed."
"Replacement gauges and other parts for canners are often available at stores offering canning equipment or from canner manufacturers. When ordering parts, give your canner model number and describe the parts needed."
-"Complete Guide to Home Canning and Preserving- Second Edition, Chapter 1, p.21."
USING PRESSURE CANNERS
"Follow these steps for successful pressure canning:"
![]() Step 1: Wash and sanitize your canning jars and lids. I wash my canning jars and lids in hot, soapy water and thoroughly rinse with clean water. I boil a large pot (greater than 6 quarts of water) and dip each jar in the boiling water with a jar lifter to further sanitize each jar from any contaminants. Drain water from jar, then I place each sanitized jar on a cookie sheet to cool slightly before filling the jars.
Step 1: Wash and sanitize your canning jars and lids. I wash my canning jars and lids in hot, soapy water and thoroughly rinse with clean water. I boil a large pot (greater than 6 quarts of water) and dip each jar in the boiling water with a jar lifter to further sanitize each jar from any contaminants. Drain water from jar, then I place each sanitized jar on a cookie sheet to cool slightly before filling the jars.
![]() Step2: Put 2-3 inches of hot water in the canner. I make sure the bottom 8 pint jars on the first row are completely covered with hot water (as mentioned in the next Step 3). This equals the 3 inches recommended.
Step2: Put 2-3 inches of hot water in the canner. I make sure the bottom 8 pint jars on the first row are completely covered with hot water (as mentioned in the next Step 3). This equals the 3 inches recommended.
![]() Step 3: Fill jars with raw product (meat does not need to be cooked before hand) into each jar. I like to use pint jars for meat processing because approximately 1 lb of meat fits into each pint jar. Make sure air is removed as much as possible, but DO NOT OVERFILL the jars and compact the meat or vegetables in the jars! Overfilling the jars can lead to breakage after processing. Make sure to leave 1 1/4 inches of head space at the top of each jar. (See Wet-Pack Canning website on "What IS HEADSPACE?" for further information here). Add 1/2 tsp. of salt to each jar. (I like to use the Morton's light salt since is doesn't make the meat taste "too salty" after processing). DO NOT add any liquid for any meats processed. The liquid will come out of the meat in the cooking process so no liquid is needed! Wipe off jar rim with a damp cloth or paper towel to remove any food particles. Dry off jar rim with a dry cloth or paper towel. Put on the jar lid and tighten until "just snug." Place filled jars on the rack, using a jar lifter. I can load 16 pint jars in my 23-quart Presto Pressure Canner like this one here that can be purchased at Amazon.com. Fasten the canner lid securely.
Step 3: Fill jars with raw product (meat does not need to be cooked before hand) into each jar. I like to use pint jars for meat processing because approximately 1 lb of meat fits into each pint jar. Make sure air is removed as much as possible, but DO NOT OVERFILL the jars and compact the meat or vegetables in the jars! Overfilling the jars can lead to breakage after processing. Make sure to leave 1 1/4 inches of head space at the top of each jar. (See Wet-Pack Canning website on "What IS HEADSPACE?" for further information here). Add 1/2 tsp. of salt to each jar. (I like to use the Morton's light salt since is doesn't make the meat taste "too salty" after processing). DO NOT add any liquid for any meats processed. The liquid will come out of the meat in the cooking process so no liquid is needed! Wipe off jar rim with a damp cloth or paper towel to remove any food particles. Dry off jar rim with a dry cloth or paper towel. Put on the jar lid and tighten until "just snug." Place filled jars on the rack, using a jar lifter. I can load 16 pint jars in my 23-quart Presto Pressure Canner like this one here that can be purchased at Amazon.com. Fasten the canner lid securely.
![]() Step 4: Leave weight off vent port or open petcock. Heat at the highest setting until steam flows from the petcock or vent port. Let pressure canner vent for 10 minutes."
Step 4: Leave weight off vent port or open petcock. Heat at the highest setting until steam flows from the petcock or vent port. Let pressure canner vent for 10 minutes."
![]() Step 5: After venting for 10 minutes, place weight on vent port or close petcock. The canner will pressurize during the next 3-5 minutes.
Step 5: After venting for 10 minutes, place weight on vent port or close petcock. The canner will pressurize during the next 3-5 minutes.
![]() Step 6: Start timing the process when the pressure reading on the dial gauge indicated that the recommended pressure has been reached, or when the weighted gauge begins to "jiggle or rock." For our local elevation in AZ (1600 ft), bring the pressure canner up to 11 lbs before setting your timers.
Step 6: Start timing the process when the pressure reading on the dial gauge indicated that the recommended pressure has been reached, or when the weighted gauge begins to "jiggle or rock." For our local elevation in AZ (1600 ft), bring the pressure canner up to 11 lbs before setting your timers.
![]() Step 7: Set your timers for 75 min for all meats processed in lower elevations in AZ. If you don't live in elevations of 0-2,000ft like we do in AZ, these are your processing pressures and times: 2,001-4,000ft (12 lbs, 75 min); 4,001-6,000ft (13 lbs and 75 min) and 6,001-9,000ft (14 lbs and 75 min). These processing times are for pint jars only! If you are using quart jars your processing times for all elevations is 90 minutes. Purchase a book called a "Complete Guide to Home Canning and Preserving" for further information on processing times for other low-acid foods like vegetables. This book is written by the U.S. Department of Agriculture and is a great resource to have. You can purchase this book here from Amazon.com.
Step 7: Set your timers for 75 min for all meats processed in lower elevations in AZ. If you don't live in elevations of 0-2,000ft like we do in AZ, these are your processing pressures and times: 2,001-4,000ft (12 lbs, 75 min); 4,001-6,000ft (13 lbs and 75 min) and 6,001-9,000ft (14 lbs and 75 min). These processing times are for pint jars only! If you are using quart jars your processing times for all elevations is 90 minutes. Purchase a book called a "Complete Guide to Home Canning and Preserving" for further information on processing times for other low-acid foods like vegetables. This book is written by the U.S. Department of Agriculture and is a great resource to have. You can purchase this book here from Amazon.com.
![]() Step 8: Regulate heat under the canner to maintain a steady pressure at or slightly above the correct gauge pressure I cook in my pressure canner on a camping stove outside on the porch. That way I don't have to heat up the house or have a high pressure pot around our children. I regulate the gas knob down to "as low as it can go" to maintain a pressure of 11-12 lbs from the dial gauge. You cannot walk away from the pressure canner when it is being used! Outside temperatures, wind, etc. can have an effect on the rise or decrease in pressure in your canner if you choose to can outside like I do. Pull up a chair and a good book and just enjoy some "outside time" while canning. Quick and large pressure variations during processing may cause unnecessary liquid loss from the jars. Weighted gauges on Micro canners should "jiggle" about 2-3 times per minutes. On Presto canners (which I own), they should rock slowly throughout the canning process.
Step 8: Regulate heat under the canner to maintain a steady pressure at or slightly above the correct gauge pressure I cook in my pressure canner on a camping stove outside on the porch. That way I don't have to heat up the house or have a high pressure pot around our children. I regulate the gas knob down to "as low as it can go" to maintain a pressure of 11-12 lbs from the dial gauge. You cannot walk away from the pressure canner when it is being used! Outside temperatures, wind, etc. can have an effect on the rise or decrease in pressure in your canner if you choose to can outside like I do. Pull up a chair and a good book and just enjoy some "outside time" while canning. Quick and large pressure variations during processing may cause unnecessary liquid loss from the jars. Weighted gauges on Micro canners should "jiggle" about 2-3 times per minutes. On Presto canners (which I own), they should rock slowly throughout the canning process.
![]() Step 9: When the time process is completed, turn off the heat, remove the canner from the heat if possible, and let the canner depressurize. DO NOT force-cool the canner by opening the lid or cooling the canner under water! Forced-cooling may result in food spoilage and jar breakage. Cooling the canner with cold running water or opening the vent port before the canner is fully depressurized, will cause loss of liquid from jars, seal failures or jar breakage. Force-cooling may also warp the canner lid of older model canners, causing steam leaks. Depressurization of older models should be timed. Standard-size, heavy-walled canners require about 30 minutes when loaded with pints and 45 minutes with quarts. Newer thin-walled canners cool more rapidly and are equipped with vent locks. These canners are depressurized when their vent lock piston drops to normal position. I have this "vent lock piston" type of Presto Pressure Canner like this one here that can be purchased from Amazon.com.
Step 9: When the time process is completed, turn off the heat, remove the canner from the heat if possible, and let the canner depressurize. DO NOT force-cool the canner by opening the lid or cooling the canner under water! Forced-cooling may result in food spoilage and jar breakage. Cooling the canner with cold running water or opening the vent port before the canner is fully depressurized, will cause loss of liquid from jars, seal failures or jar breakage. Force-cooling may also warp the canner lid of older model canners, causing steam leaks. Depressurization of older models should be timed. Standard-size, heavy-walled canners require about 30 minutes when loaded with pints and 45 minutes with quarts. Newer thin-walled canners cool more rapidly and are equipped with vent locks. These canners are depressurized when their vent lock piston drops to normal position. I have this "vent lock piston" type of Presto Pressure Canner like this one here that can be purchased from Amazon.com.
![]() Step 10: After the canner is depressurized, remove the weight from the vent port or open the petcock. Wait 5 minutes, unfasten the lid, and remove it carefully. Open the lid away from you so the steam doesn't blast in your face and burn you when you open it!
Step 10: After the canner is depressurized, remove the weight from the vent port or open the petcock. Wait 5 minutes, unfasten the lid, and remove it carefully. Open the lid away from you so the steam doesn't blast in your face and burn you when you open it!
![]() Step 11: Remove jars with a jar lifter, and place on a towel or cooling rack. Liquid in the jars will be boiling for some time so be careful to set the jars way from young children so they don't get burned! Cool the jars for 24-hrs before touching or moving into storage.
Step 11: Remove jars with a jar lifter, and place on a towel or cooling rack. Liquid in the jars will be boiling for some time so be careful to set the jars way from young children so they don't get burned! Cool the jars for 24-hrs before touching or moving into storage.
![]() Step 12: Wash outside of jars and jar lids before storing. The outside of the canning jars will be covered with a small film of grease after processing meats. This needs to be washed off with soapy water and rinsed before storage. The lids of the jars also need to be washed with soapy water and rinsed. Once jars and lids are rinsed, dry them thoroughly with a paper towel. I store my jars with the lids on them but some prefer to store the canning jars with the lids removed. I think it is a matter of personal preference. I then label each jar with the contents of the jar and when it was processed so I know which jars to use first from our food storage. Store the jars on a 2,000 lb shelf or greater since these jars each weigh approximately 1 lb so they can be pretty heavy as you load up your shelves with meat. Go here to read more information about our 2,000 lb shelf (on web page "Storage Ideas") we use to store our pressure canned meat.
Step 12: Wash outside of jars and jar lids before storing. The outside of the canning jars will be covered with a small film of grease after processing meats. This needs to be washed off with soapy water and rinsed before storage. The lids of the jars also need to be washed with soapy water and rinsed. Once jars and lids are rinsed, dry them thoroughly with a paper towel. I store my jars with the lids on them but some prefer to store the canning jars with the lids removed. I think it is a matter of personal preference. I then label each jar with the contents of the jar and when it was processed so I know which jars to use first from our food storage. Store the jars on a 2,000 lb shelf or greater since these jars each weigh approximately 1 lb so they can be pretty heavy as you load up your shelves with meat. Go here to read more information about our 2,000 lb shelf (on web page "Storage Ideas") we use to store our pressure canned meat.
"See Pressure Canning Steps below in a picture format:"
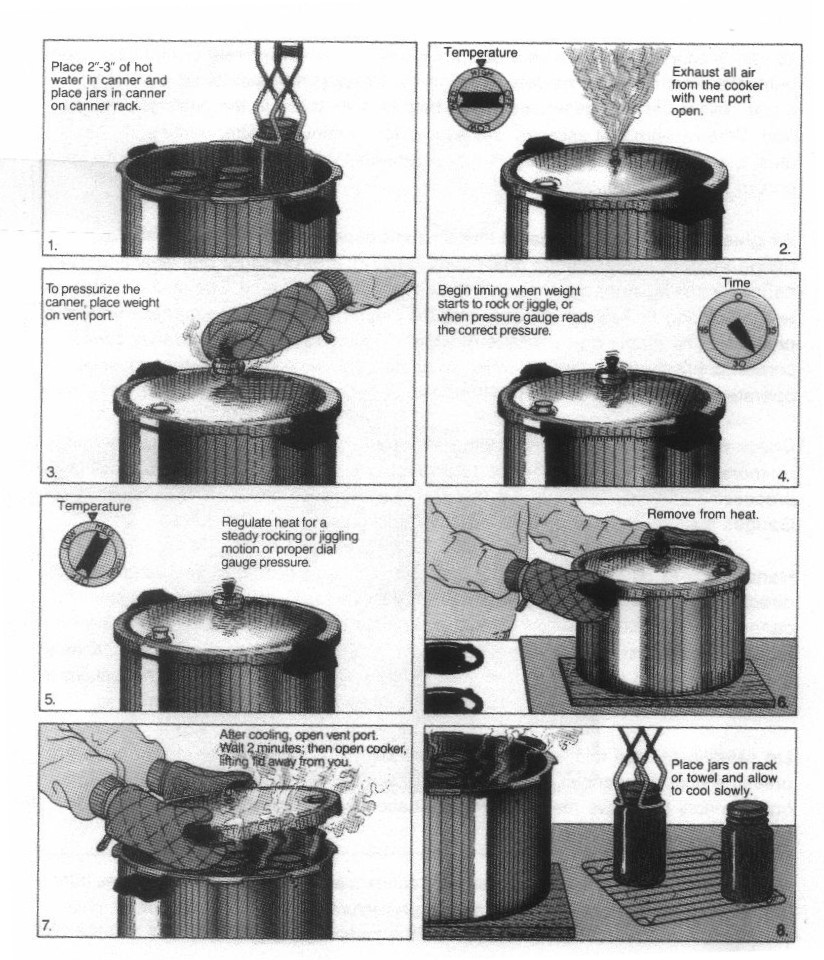
-"Complete Guide to Home Canning and Preserving- Second Edition, Chapter 1, p.21-23."

Email: johnjen at reynoldsnet.org